

Branding & Toolkits
Toolkits
How to Use This Toolkit
In this toolkit you will find the materials you and your public health partners can use to promote safe food handling practices for pig roasts among your constituents.
We have organized this material to help make your outreach informative, helpful and fun. Resources include:
To encourage co-branding, you may add your organization’s name to outreach materials and media resources. We have talking points for development of your own content, interviews or speeches. A gallery of generic food safety photographs and infographics are available to use free through the FSIS Flickr site.
Overview
Meat and poultry companies are responsible for ensuring that the products they produce are safe, and FSIS works to verify that companies are making safe food. Consumers also play a role in preventing foodborne illnesses — commonly known as food poisoning.
Roasting a whole pig requires a lot of planning before, during and after the meal to ensure food safety. Over the past few years, there have been foodborne illness outbreaks associated with pig roasts in several states. FSIS is hopeful that the information in this toolkit will be shared and prevent future foodborne illness outbreaks.
Enjoy your Pig Roast with the Four Steps to Food Safey:
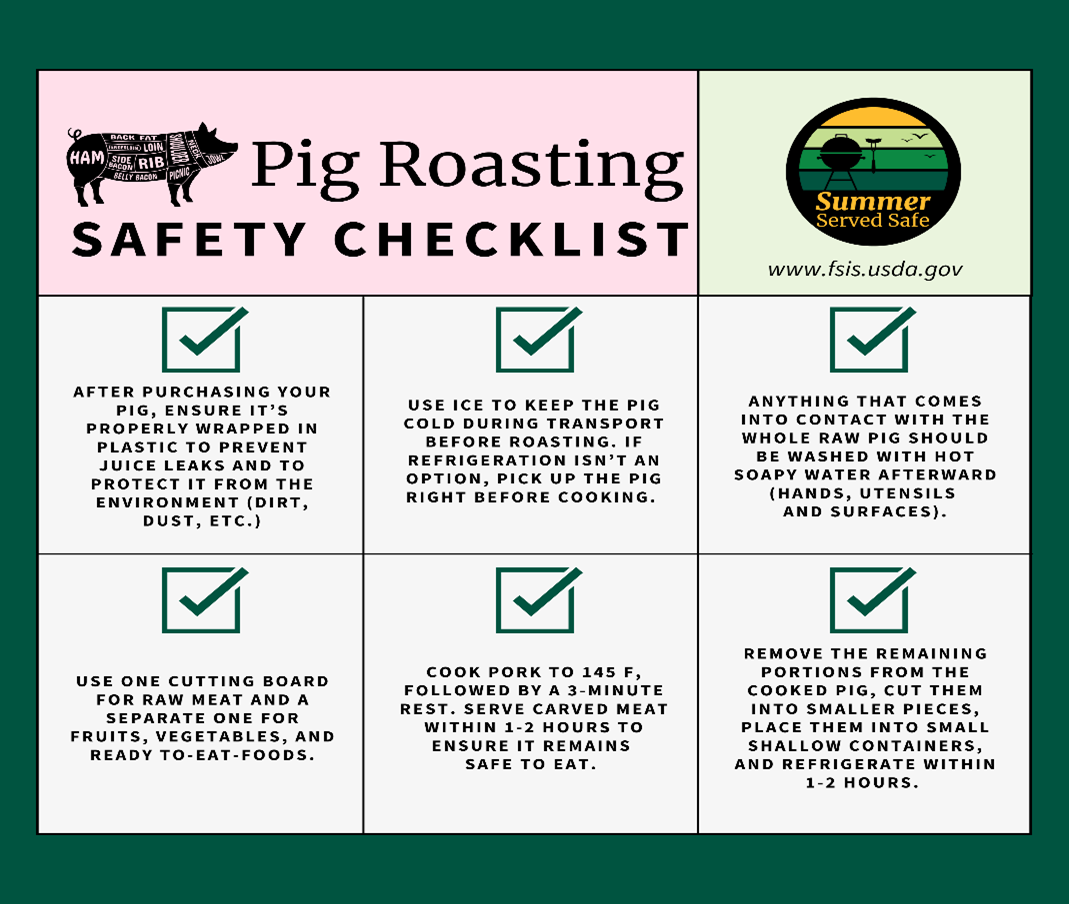
- Clean: Before food preparation, wash hands for 20 seconds with water and soap and start with clean surfaces and utensils. Anything that touches the carcass must be washed with hot soapy water afterward (hands, utensils and surfaces). This is because harmful bacteria from the pig carcass can contaminate anything it touches, which could cause illness.
- Separate: To avoid the spread of bacteria when preparing a whole pig for roasting, prepare the pig in a separate area from other food preparation or fully clean and sanitize preparation area and utensils before preparing other foods. Ready to eat foods, such as vegetables and side dishes, should not be prepared or placed on surfaces or utensils that have touched the raw pig unless they have been cleaned and sanitized first.
- Cook: There are several common ways to roast a whole pig: closed pit/oven, open pit, and underground. No matter your method, pork products must reach a minimum internal temperature of 145 degrees F with a 3-minute rest time. Use a food thermometer to check the internal temperature in several places (the shoulders, between the shoulders, hams [hind quarter], and stuffing, if included). This is because they are so large that one spot of the pig may have reached 145 degrees F, but other parts of the pig could still be undercooked. The thermometer must be inserted deeply into thick parts of the meat without touching the bone to get accurate readings. During cooking, the air temperature should remain around 225 degrees F to 250 degrees F.
- Chill: Once the pig is cooked, serve promptly. If there will be leftovers, fully carve the cooked pig into smaller pieces and place them into shallow containers for faster and even cooling. It is not safe to refrigerate the whole cooked pig without carving. Refrigerate the leftovers within 2 hours after the pig is initially served, or 1-hour if the temperature is above 90 degrees F.
Purchasing your Pig
- You can purchase a live pig and have it processed by an inspected facility or custom operator. Live pigs can be purchased from local farmers or arranged with the help of an inspected or custom operator. Whole pig carcasses can be purchased from inspected facilities or retail meat markets and grocery stores that offer them for sale. You may need to ask and allow for sufficient time for them to make arrangements.
- Have the supplier wrap the pig in food-grade plastic to protect the pig from the environment (dust, dirt, etc.) and prevent the juices from spreading harmful bacteria.
- Keep the pig cold by placing it in the refrigerator or nestled under ice in a large cooler or container. This will keep the meat from entering the Danger Zone, where harmful bacteria multiply rapidly and could get you sick. Check to confirm the ice cubes are not melted – this means it is maintaining a safe temperature below 40 degrees F. Replenish ice as needed.
- Many whole pigs are too large to fit in a refrigerator. If you can’t keep the pig refrigerated or under ice, pick it up just before you are ready to cook.
Thawing your Pig
- It is not safe to thaw the pig at room temperature.
- Frozen pigs, depending on their size, will need several days to thaw before cooking.
- A whole pig can be thawed in a refrigerator or nestled under ice in a large cooler or container. Check to confirm the ice cubes do not melt – this means it is at a safe temperature below 40 degrees F. Replenish ice as needed. Clean and sanitize the cooler or container before and after thawing.
- If you don’t have a safe way to thaw the pig, plan to pick up a thawed pig right before the event.
Contact USDA’s Meat and Poultry Hotline with any pig roasting or other food safety questions.
- For food safety questions, call the USDA Meat and Poultry Hotline at 1-888-MPHotline (1-888-674-6854), email MPHotline@usda.gov from 10 a.m. to 6 p.m. Eastern Time, Monday through Friday. Food safety specialists are available to answer your questions in English and Spanish.
Share Pig Roasting Food Safety guidance with your followers and be sure to use the hashtag: #PigRoast #FoodSafety. Follow us on X, Instagram, and Facebook for our food safety posts. Don’t forget to tag us in your posts (X: @USDAFoodSafety & Instagram: @usdagov) and repost us!
Pig Roasting Safety Checklist
English: Pig Roasting Safety Checklist | USDA FoodSafety | Flickr
Pig Roasting Safety Checklist
Cómo Utilizar Este Kit de Herramientas
En este kit de herramientas encontrará los materiales que usted y sus socios de salud pública pueden utilizar para promover prácticas adecuadas de manipulación de alimentos para asados de cerdo entre sus electores.
Hemos organizado este material para ayudar a que su divulgación sea informativa, útil y divertida. Los recursos incluyen:
Para fomentar la marca compartida, puede agregar el nombre de su organización a los materiales de divulgación y recursos de medios. Disponemos de puntos de conversación para el desarrollo de contenidos propios, entrevistas o discursos. Una galería de fotografías e infografías genéricas sobre seguridad alimentaria está disponible para su uso gratuito a través del sitio FSIS Flickr.
Descripción General
Las empresas cárnicas y avícolas son responsables de garantizar que los productos que producen sean seguros, y el Food Safety and Inspection Service (FSIS) trabaja para verificar que las empresas estén elaborando alimentos seguros. Los consumidores también desempeñan un papel en la prevención de enfermedades transmitidas por los alimentos, comúnmente conocidas como intoxicaciones alimentarias.
Asar un cerdo entero requiere mucha planificación antes, durante y después de la comida para garantizar la seguridad alimentaria. En los últimos años, ha habido brotes de enfermedades transmitidas por los alimentos asociados con el cerdo asado en varios estados. El FSIS tiene la esperanza de que la información contenida en este kit de herramientas se comparta y prevenga futuros brotes de enfermedades transmitidas por alimentos.
Disfrute de su Cerdo Asado con los Cuatro Pasos para un Manejo Adecuado de los Alimentos:
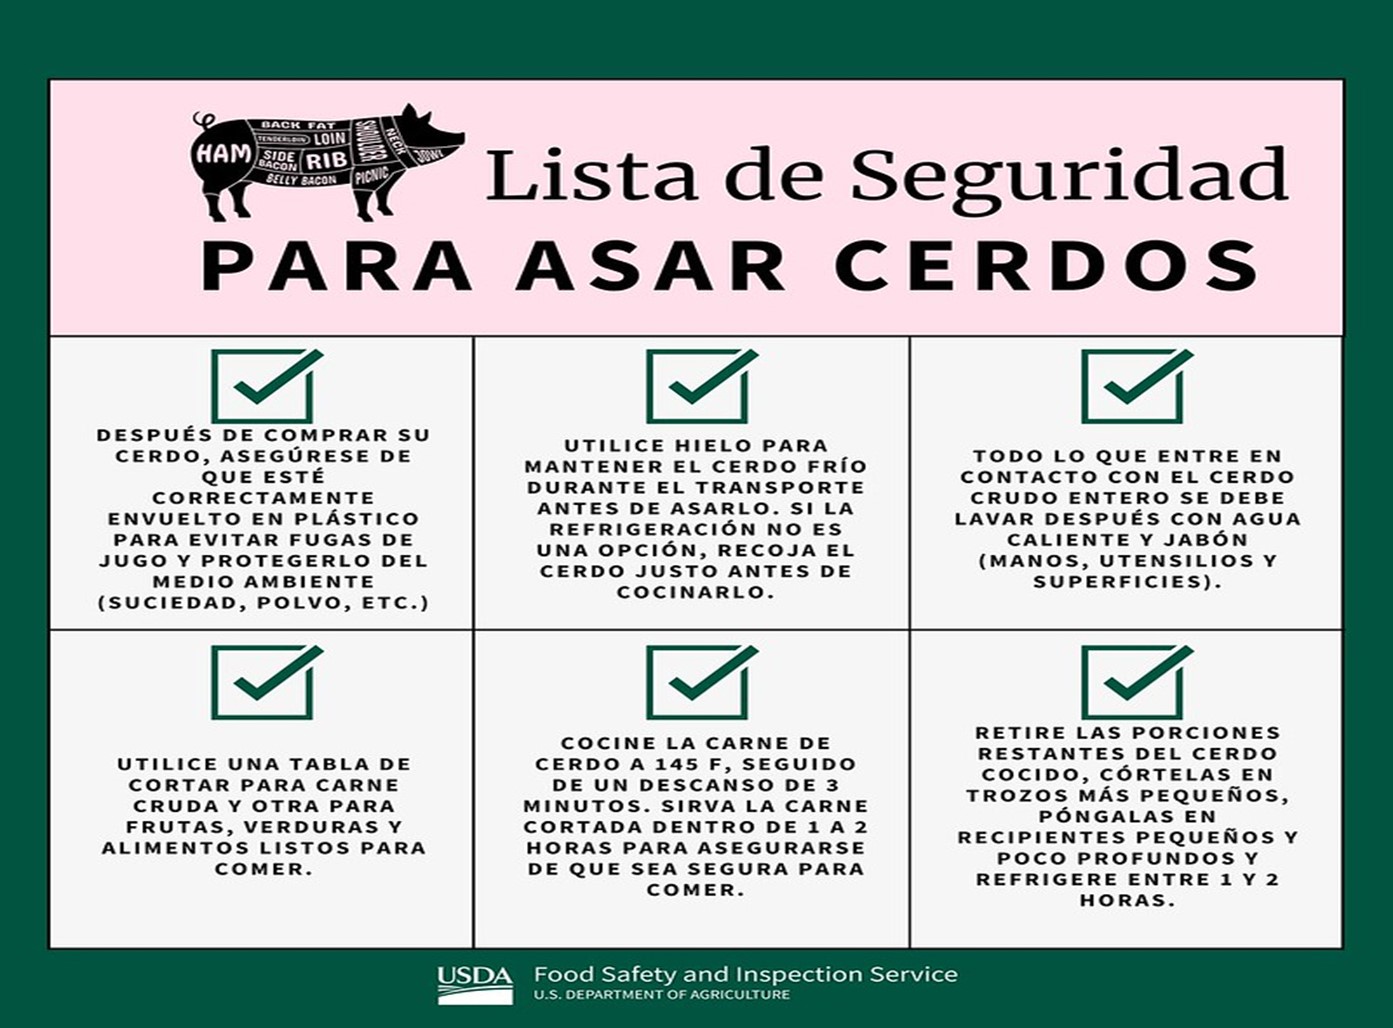
- Limpiar: Antes de preparar los alimentos, lávese las manos durante 20 segundos con agua y jabón y comience con superficies y utensilios limpios. Todo lo que toque el cerdo crudo debe lavarse después con agua caliente y jabón (manos, utensilios y superficies). Esto se debe a que las bacterias dañinas del cuerpo del cerdo pueden contaminar cualquier cosa que toque, lo que podría causar enfermedades.
- Separar: Para evitar la propagación de bacterias al preparar un cerdo entero para asar, prepare el cerdo en un área separada de otras preparaciones de alimentos o limpie y desinfecte completamente el área de preparación y los utensilios antes de preparar otros alimentos. Los alimentos listos para comer, como verduras y guarniciones, no deben prepararse ni colocarse sobre superficies o usar utensilios que hayan estado en contacto con el cerdo crudo, a menos que se hayan limpiado y desinfectado primero.
- Cocinar: Hay varias formas comunes de asar un cerdo entero: hoyo cerrado/horno, hoyo abierto y bajo tierra. No importa cuál sea su método, los productos de cerdo deben alcanzar una temperatura interna mínima de 145 grados F con un tiempo de descanso de 3 minutos. Use un termómetro para alimentos para verificar la temperatura interna en varios lugares (las paletas, entre las paletas, los jamones [cuartos traseros] y el relleno, si está incluido). Esto se debe a que son tan grandes que una parte del cerdo puede haber alcanzado los 145 grados F, pero otras partes del cerdo aún podrían estar poco cocidas. El termómetro debe insertarse profundamente en las partes gruesas de la carne sin tocar el hueso para obtener lecturas precisas. Durante la cocción, la temperatura del aire debe permanecer entre 225 grados F y 250 grados F.
- Enfriar: Una vez que el cerdo esté cocido, sírvalo inmediatamente. Si quedan sobras, corte completamente el cerdo cocido en trozos más pequeños y colóquelos en recipientes poco profundos para que se enfríe más rápido y de manera uniforme. No es seguro refrigerar el cerdo cocido entero sin cortarlo. Refrigere las sobras dentro de las 2 horas después a que se sirva inicialmente el cerdo, o 1 hora si la temperatura es superior a 90 grados F.
Comprar el Cerdo
- Puede comprar un cerdo vivo y hacer que lo procese una instalación inspeccionada o un operador personalizado. Los cerdos vivos se pueden comprar con granjeros locales u obtenerlo con la ayuda de un operador inspeccionado o personalizado. Los cerdos enteros se pueden comprar en instalaciones inspeccionadas o en mercados minoristas de carne y tiendas de comestibles que las ofrecen a la venta. Es posible que deba preguntar y darles tiempo suficiente para hacer los arreglos.
- Haga que el proveedor envuelva al cerdo en plástico apto para uso alimentario para protegerlo del medio ambiente (polvo, suciedad, etc.) y evitar que los jugos propaguen bacterias dañinas.
- Mantenga el cerdo frío colocándolo en el refrigerador, sobre hielo o bajo hielo en una hielera o recipiente grande. Esto evitará que la carne entre en la Zona de Peligro, donde las bacterias dañinas se multiplican rápidamente y podrían enfermarle. Verifique que los cubitos de hielo no estén derretidos; esto significa que se mantiene una temperatura segura por debajo de 40 grados F. Reponga el hielo según sea necesario.
- Muchos cerdos enteros son demasiado grandes para caber en el refrigerador. Si no puede mantener el cerdo refrigerado o bajo de hielo, recójalo justo antes de que esté listo para cocinar.
Como Descongelar el Cerdo
- No es seguro descongelar el cerdo a temperatura ambiente.
- Los cerdos congelados, dependiendo de su tamaño, necesitarán varios días para descongelarse antes de cocinarlos.
- Un cerdo entero se puede descongelar en el refrigerador o bajo hielo en una hielera o recipiente grande. Verifique que los cubitos de hielo no se derritan; esto significa que están a una temperatura segura por debajo de 40 grados F. Reponga el hielo según sea necesario. Limpie y desinfecte la hielera o el recipiente antes y después de descongelar el cerdo.
- Si no tiene una forma segura de descongelar el cerdo, planee recoger un cerdo descongelado justo antes del evento.
Comuníquese con la Línea Directa de Carnes y Aves del USDA si tiene alguna pregunta sobre el asado de cerdo u otras cuestiones sobre el manejo adecuado de los alimentos.
- Si tiene preguntas sobre el manejo adecuado de los alimentos alimentaria, llame a la Línea Directa de Carnes y Aves del USDA al 1-888-MPHotline (1-888-674-6854), envíe un correo electrónico a MPHotline@usda.gov de 10 a. m. a 6 p. m. Hora del este, de lunes a viernes. Los especialistas en seguridad alimentaria están disponibles para responder sus preguntas en inglés y español.
Comparta la guía sobre seguridad alimentaria del asado de cerdo con sus seguidores y asegúrese de utilizar el hashtag: #PigRoast #FoodSafety. Síganos en X, Instagram y Facebook para conocer nuestras publicaciones sobre seguridad alimentaria. ¡No olvide etiquetarnos en sus publicaciones (X: @USDAFoodSafety e Instagram: @usdagov) y volver a publicarnos!
Lista de Seguridad Para Asar Cerdos
Español: Lista de Seguridad Para Asar Cerdos | USDA FoodSafety | Flickr
How to Use This Toolkit
This toolkit is designed to help promote food safety information during weather emergencies, such as: power outages, floods, severe storms, hurricanes and fires. In this toolkit you will find the materials you can use to promote safe food handling during these challenging times.
We have organized this material to help make your outreach informative and helpful. Resources include:
- Talking Points
- Free Food Safety Brochures and Publications
- Other Sources of Emergency Food Safety Information
- Social Media
- Infographics
To encourage co-branding, you may add your organization’s name to outreach materials and media resources. We have talking points for interviews or speeches. A gallery of photographs and infographics are available to use freely through the FSIS Flickr site.
Overview
Meat and poultry companies are responsible for ensuring that the products they produce are safe, and FSIS verifies that companies are making safe food. Consumers also play a role in preventing foodborne illnesses—commonly known as food poisoning.
Emergencies like power outages, floods, severe storms and hurricanes are unpredictable. Knowing how to keep food safe and how to determine if food is safe helps minimize the potential loss of food and reduce the risk of foodborne illness.
Did you know that a flood, fire, national disaster or power loss could jeopardize the safety of your food? Make the right decisions for keeping your family safe during an emergency.
Power Outages
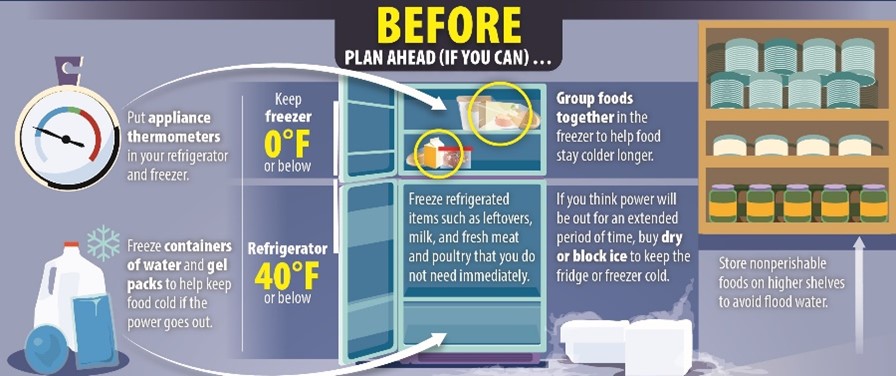
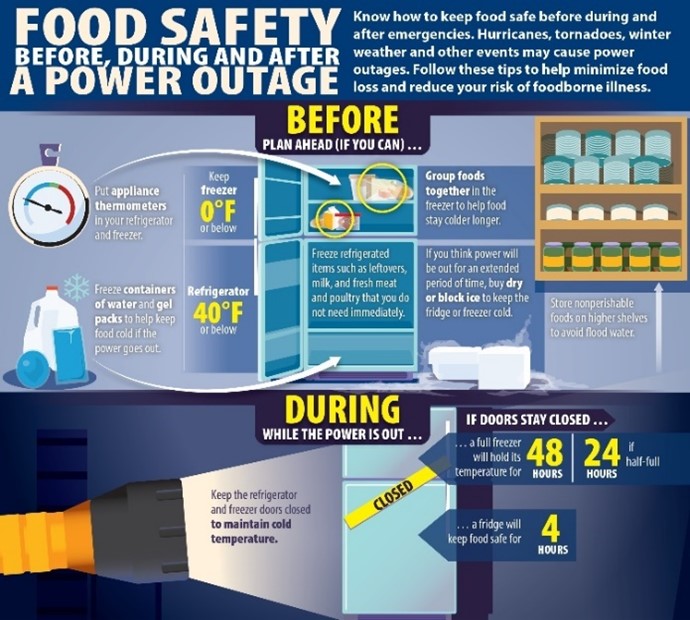
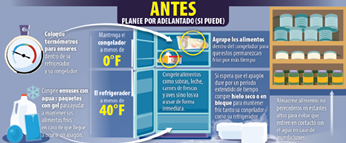
- Plan ahead—keep an appliance thermometer in the refrigerator and freezer. An appliance thermometer will show the temperature in the refrigerator and freezer in case of a power outage and help determine if the food is being held at a safe temperature.
- Make sure the freezer is at 0 degrees F or below and the refrigerator is at 40 degrees F or below.
- Freeze water in small storage bags or containers for ice to help keep food cold in the freezer, refrigerator, or coolers after the power is out.
- Freeze refrigerated items such as leftovers, milk and fresh meat and poultry that you may not need immediately—this helps keep them at a safe temperature longer.
- Group food together in the freezer—this helps the food stay cold longer.
- Consider getting 50 pounds of dry or block ice if a lengthy power outage is possible. This amount of ice should keep a fully stocked 18-cubic-feet freezer cold for two days. Have coolers on hand to keep refrigerator food cold if the power will be out for more than 4 hours. Purchase or make ice cubes and store in the freezer for use in the refrigerator or in a cooler. Freeze gel packs ahead of time for use in coolers.
- Keep a few days’ worth of ready-to-eat foods that do not require cooking or cooling.
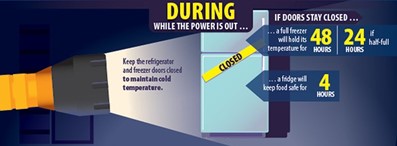
- During the Power Outage
- Keep the refrigerator and freezer doors closed as much as possible to maintain the cold temperature inside the appliance.
- The refrigerator will keep food safely cold for about 4 hours if it is unopened. A full freezer will hold the temperature for approximately 48 hours (24 hours if it is half full) if it is unopened.
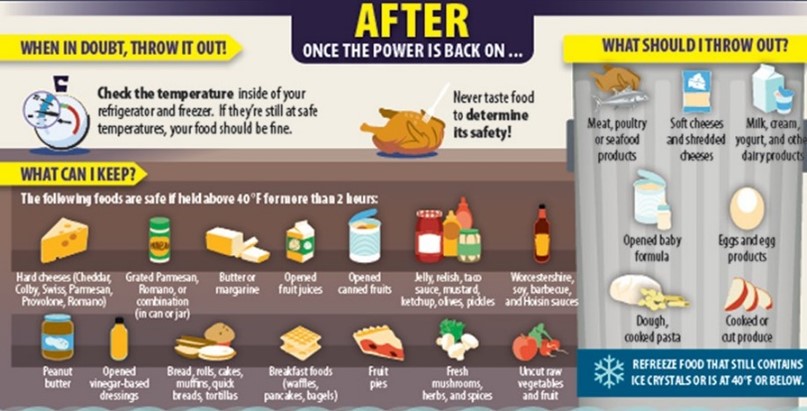
- If the power has been out for several days, check the temperature of the freezer with an appliance thermometer or food thermometer. If the food still contains ice crystals or is at 40 degrees F or below, the food is safe.
- If an appliance thermometer has not been kept in the freezer, check each package of food to determine its safety. If the food still contains ice crystals, the food is safe.
- After 4 hours without power, transfer refrigerated perishable food such as meat, poultry, fish, soft cheeses, milk, eggs, leftovers and deli items to a cooler with ice or discard.
- During a snowstorm, do not place perishable food out in the snow. Outside temperatures can vary and food can be exposed to unsanitary conditions and animals. Instead, make ice. Fill buckets, empty milk containers or cans with water, then leave them outside to freeze. Use the homemade ice in your refrigerator, freezer or coolers.
- After the Power Outage
- Discard any perishable foods that have not been at a safe temperature (over 4 hours in refrigerator, 24 hours in half full freezer, or 48 hours for full freezer). Food may be safely refrozen if it still contains ice crystals or is at 40 degrees F or below.
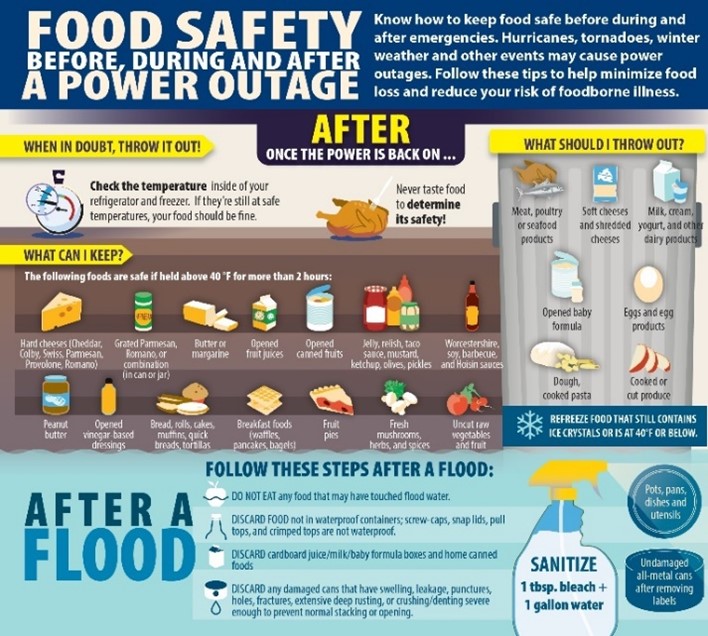
- Never taste a food to determine its safety. When in Doubt, Throw it Out!
- Visit our refrigerated and frozen foods tables in the A Consumer's Guide to Food Safety: Severe Storms and Hurricanes factsheet to know of hen to save and when to throw out foods.
Floods
- Plan Ahead—If possible, raise refrigerators and freezers off the floor, putting cement blocks under their corners. Move canned goods and other foods that are kept in the basement or low cabinets to a higher area.
- After the Flood
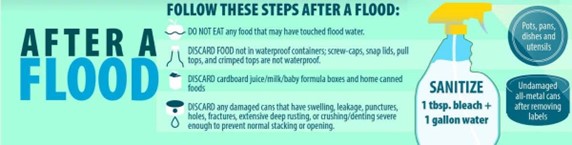
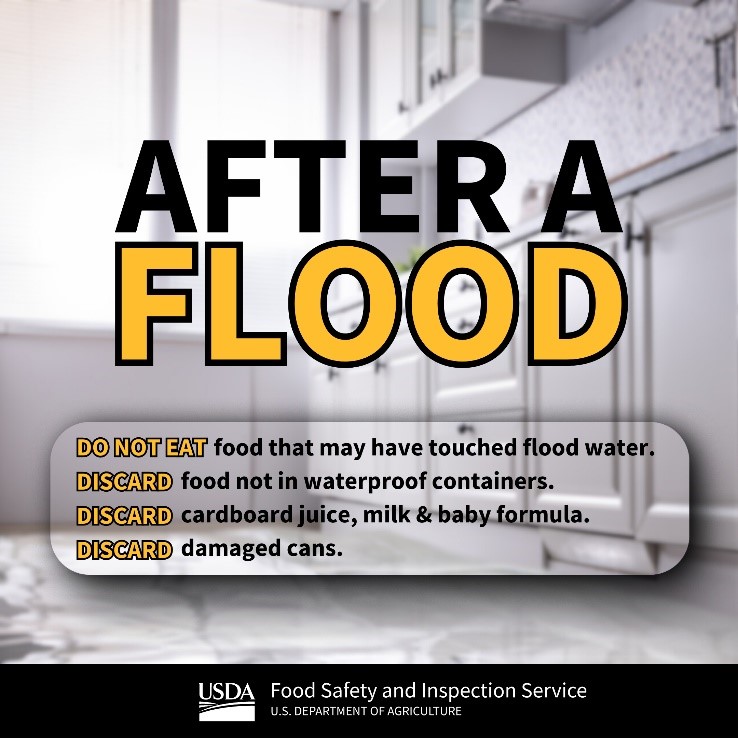
- Do not eat any food that may have come into contact with flood water.
- Discard any food that is not in a waterproof container if there is any chance that it has come into contact with flood water. Food containers that are not waterproof include those with screw caps, snap lids, pull tops and crimped caps.
- Discard bottled water, cardboard juice/milk/baby formula boxes and home-canned foods if they have come in contact with flood water, because they cannot be effectively cleaned and sanitized.
- Inspect canned foods and discard any food in damaged cans. Signs of damage to the can may include swelling, leakage, punctures, holes, fractures, extensive deep rusting, or crushing/denting severe enough to prevent normal stacking or opening with a manual, wheel-type can opener. Undamaged, commercially prepared foods in all-metal cans and retort pouches, such as flexible, shelf-stable juice or seafood pouches, can be saved by following these 6 easy steps:
- Remove the labels if possible. They can harbor dirt and bacteria.
- Thoroughly wash the cans or retort pouches with soap and water (use hot water if available).
- Brush or wipe away any dirt or silt.
- Rinse the cans or retort pouches with water that is safe for drinking (if available). Dirt or residual soap will reduce the effectiveness of chlorine sanitation.
- Then sanitize them by immersion in one of the following ways:
- Place in water. Allow the water to come to a boil for 2 minutes.
Or - Place in a freshly made solution consisting of 1 tablespoon of unscented, liquid chlorine bleach per gallon of drinking water (or the cleanest, clearest water available) for 15 minutes.
- Allow to air-dry for a minimum of 1 hour before opening or storing.
- Relabel the cans or retort pouches with a marker. Include the expiration date if available.
- Use the food in these reconditioned cans and retort pouches as soon as possible. Any concentrated baby formula in reconditioned, all-metal containers must be diluted with clean, drinking water.
- Cookware, Utensils and Counter Tops
- Thoroughly wash metal pans, ceramic dishes and utensils (including can openers) with soap and water, using hot water if available. Rinse and then sanitize them by boiling them for 2 minutes in clean water OR immersing them for 15 minutes in a solution of 1 tablespoon of unscented, liquid chlorine bleach per gallon of drinking water (or the cleanest, clearest water available).
- Thoroughly wash countertops with soap and water, using hot water if available. Rinse and then sanitize them by applying a solution of 1 tablespoon of unscented, liquid chlorine bleach per gallon of drinking water (or the cleanest, clearest water available). Allow to air-dry.
Fires
- Discard all food that has been near a fire. Food exposed to fire can be damaged by the heat of the fire, smoke, fumes and fire-fighting chemicals. These fumes and chemicals cannot be washed off. These foods include:
- Foods stored outside of the refrigerator, such as bread, fruits and vegetables.
- Raw food or food in permeable packaging (cardboard, plastic wrap, etc.).
- All foods in cans, bottles and jars. While they may appear to be okay, the heat from a fire can damage the containers and can activate food spoilage bacteria.
- Foods stored in refrigerators or freezers. Refrigerator seals are not airtight, and fumes can get inside.
- Sanitize cookware exposed to fire-fighting chemicals by washing in soap and hot water. Then submerge for 15 minutes in a solution for 1 tablespoon of unscented, liquid chlorine bleach per gallon of drinking water.
Free Food Safety Brochures and Publications
FSIS offers a free Consumer’s Guide to Severe Storms and Hurricanes. To request a copy, visit our Brochures and Publications webpage and submit a publication request form. This guide and many other publications are also available to order, download or view in PDF format in both English and Spanish.
Other Sources of Emergency Food Safety Information
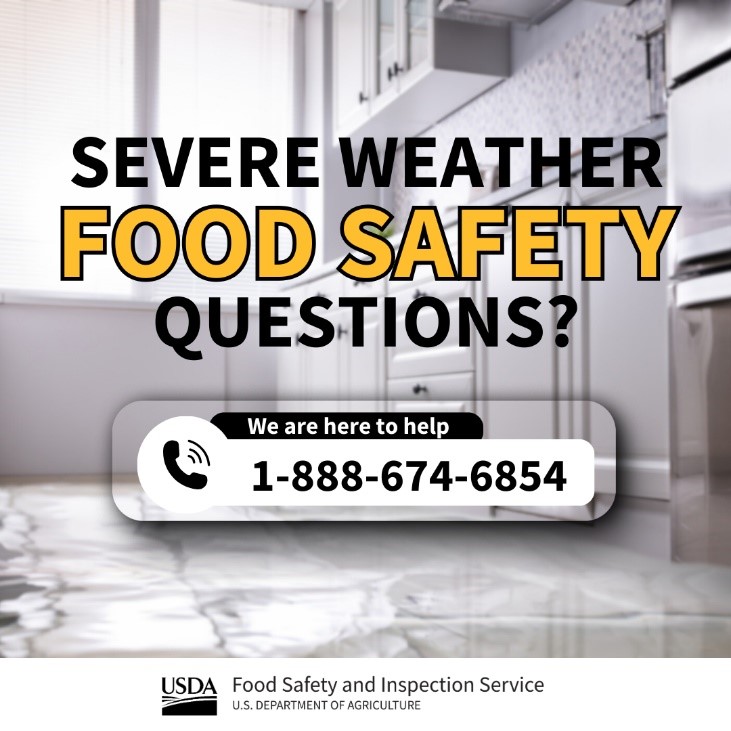
- Contact USDA’s Meat and Poultry Hotline with any food safety questions at 1-888-MPHotline (1-888-674-6854), email MPHotline@usda.gov from 10 a.m. to 6 p.m. Eastern Time, Monday through Friday.
- U.S. Food and Drug Administration
www.fda.gov/Food/default.htm - Centers for Disease Control and Prevention
www.cdc.gov - Federal Emergency Management Agency
www.fema.gov - Your local chapter of the American Red Cross or state and local emergency planning offices can also offer additional information about emergency management during natural disasters.
Share Food Safety guidance during weather emergencies with your followers and be sure to use the hashtag: #FoodSafety follow us on X in English or Spanish, Instagram and Facebook for our food safety content and repost us. Don’t forget to tag us!
Examples:
- Experiencing severe weather? There are several things you can you do to ensure the safety of your food. Visit Keep your Food Safe During Emergencies: Power Outages, Floods & Fires.
- During power outages, keep the fridge/freezer CLOSED as much as possible to maintain temps. Opening/closing multiple times brings perishable food items out of the food safety temperature zone. Visit Danger Zone to learn more.
- Reference our food guidance chart on “what to save and what to throw out” after a prolonged power outage.
- Reference our food guidance chart after a prolonged power outage.
Food Safety Before a Power Outage
English: https://flic.kr/p/2qb8Zam
Spanish: https://flic.kr/p/2qbbDig
Food Safety During a Power Outage
English: https://flic.kr/p/2qb8Zam
Spanish: https://flic.kr/p/2qb8oWk
Food Safety After a Power Outage
English: https://flic.kr/p/2qb8oW5
Spanish: https://flic.kr/p/2qb7W8u
After a Flood
English: https://flic.kr/p/2b3BNFv
Spanish: https://flic.kr/p/29X7hk9
Food Safety Before and During a Power Outage
English: https://flic.kr/p/Lcamv8
Spanish: https://flic.kr/p/Lcanjc
Food Safety After a Power Outage
English: https://flic.kr/p/KfCrZD
Spanish: https://flic.kr/p/L9hmzS
Severe Weather Food Safety Questions?
English: https://flic.kr/p/2qa8mz5
Spanish: https://flic.kr/p/2qa8nYn
After a Flood
English: https://flic.kr/p/2qaecdP
Spanish: https://flic.kr/p/2qafhuf

Food Safety Questions Related to Severe Weather?
English: https://flic.kr/p/2qb23NE
Spanish: https://flic.kr/p/2qb23N4
Cómo Utilizar Este Kit de Herramientas
Este conjunto de herramientas está diseñado para ayudar a promover información sobre seguridad alimentaria durante emergencias climáticas como: cortes de energía, inundaciones, tormentas severas, huracanes e incendios. En este kit de herramientas encontrará los materiales que puede utilizar para promover la manipulación segura de los alimentos durante estos tiempos difíciles.
Hemos organizado este material para ayudar a que su divulgación sea informativa y útil. Los recursos incluyen:
- Puntos de Conversación
- Folletos y Publicaciones Gratuitas Sobre Seguridad Alimentaria
- Otras Fuentes de Información de Emergencia Sobre Seguridad Alimentaria
- Redes Sociales
- Infografías
Para fomentar la marca compartida, puede agregar el nombre de su organización a los materiales de divulgación y recursos de medios. Tenemos puntos de conversación para entrevistas o discursos. Una galería de fotografías e infografías está disponible para su uso gratuito a través del sitio FSIS Flickr.
Descripción General
Las empresas cárnicas y avícolas son responsables de garantizar que los productos que producen sean seguros, y el FSIS trabaja para verificar que las empresas estén elaborando alimentos seguros. Los consumidores también desempeñan un papel en la prevención de enfermedades transmitidas por los alimentos, comúnmente conocidas como intoxicación alimentaria.
Emergencias como cortes de energía, inundaciones, tormentas severas y huracanes son impredecibles. Saber cómo mantener los alimentos seguros y cómo determinar si los alimentos son seguros ayuda a minimizar la posible pérdida de alimentos y reducir el riesgo de enfermedades transmitidas por los alimentos.
¿Sabía que una inundación, un incendio, un desastre nacional o un corte de energía podrían poner en peligro la seguridad de sus alimentos? Tome las decisiones correctas para mantener segura a su familia durante una emergencia.
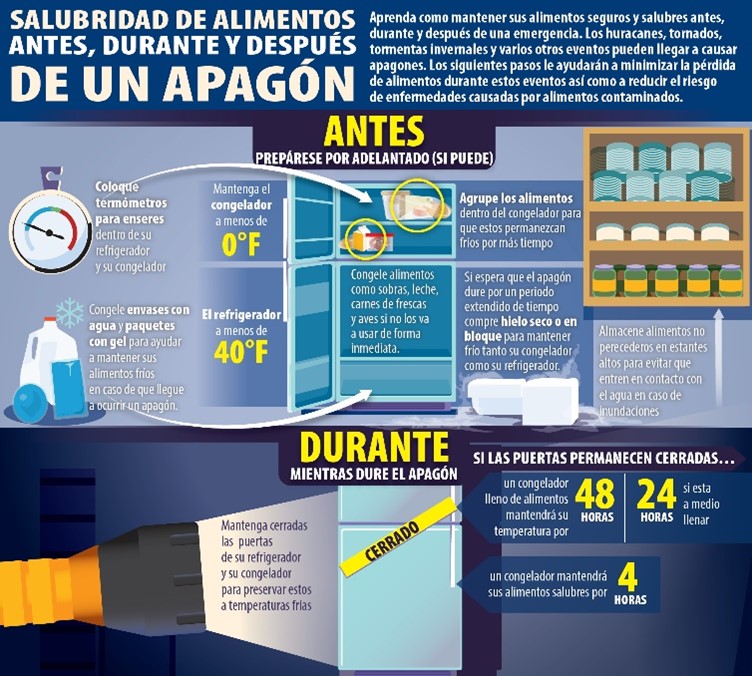
Cortes de Energía
- Planifique con anticipación: mantenga un termómetro para electrodomésticos en el refrigerador y el congelador. Un termómetro para electrodomésticos indicará la temperatura en el refrigerador y el congelador en caso de un corte de energía y ayudará a determinar si los alimentos se mantienen a una temperatura segura.
- Asegúrese de que el congelador esté a 0 grados F o menos y el refrigerador a 40 grados F o menos.
- Congele agua en pequeñas bolsas de almacenamiento o recipientes para hielo para ayudar a mantener los alimentos fríos en el congelador, refrigerador o hieleras después de un corte de energía.
- Congele los artículos refrigerados, como sobras, leche y carnes y aves frescas que quizás no necesite de inmediato; esto ayuda a mantenerlos a una temperatura segura por más tiempo.
- Agrupe los alimentos en el congelador: esto ayuda a que los alimentos permanezcan fríos por más tiempo.
- Considere adquirir 50 libras de hielo seco o en bloque si es posible un corte de energía prolongado. Esta cantidad de hielo debería mantener frío un congelador de 18 pies cúbicos completamente abastecido durante dos días. Tenga a mano hieleras para mantener fríos los alimentos del refrigerador si se va a cortar la electricidad durante más de 4 horas. Compre o haga cubitos de hielo y guárdelos en el congelador para usarlos en el refrigerador o en una hielera. Congele los paquetes de gel con anticipación para usarlos en hieleras.
- Guarde alimentos listos para comer para unos días que no requieran cocción ni enfriamiento.
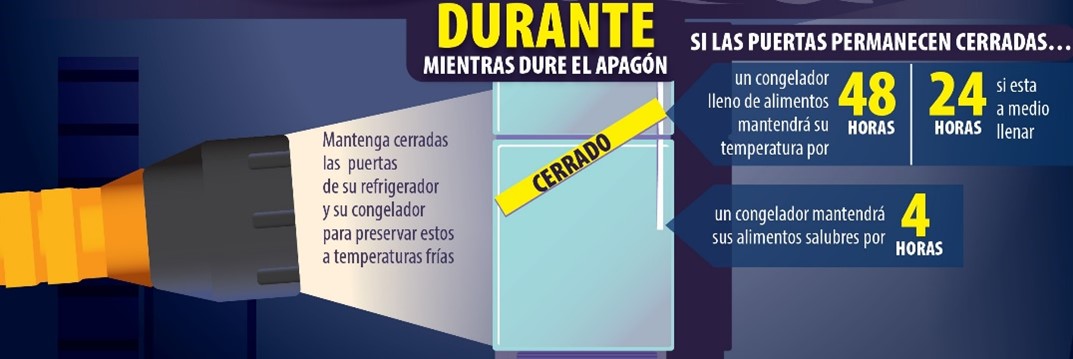
- Durante el corte de energía
- Mantenga las puertas del refrigerador y del congelador cerradas tanto como sea posible para mantener la temperatura fría dentro del aparato.
- El refrigerador mantendrá los alimentos fríos de manera segura durante aproximadamente 4 horas si no está abierto. Un congelador lleno mantendrá la temperatura durante aproximadamente 48 horas (24 horas si está medio lleno) si no está abierto.
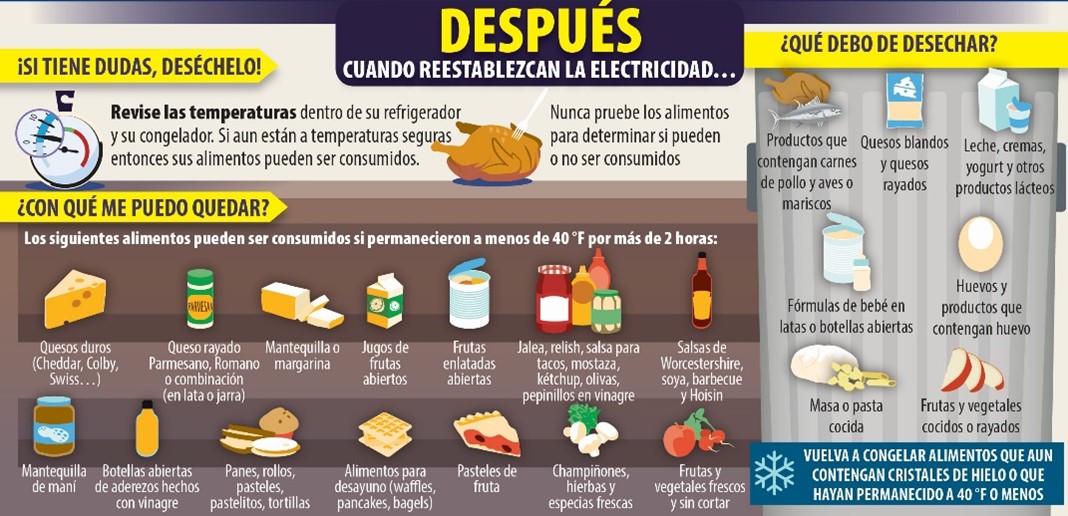
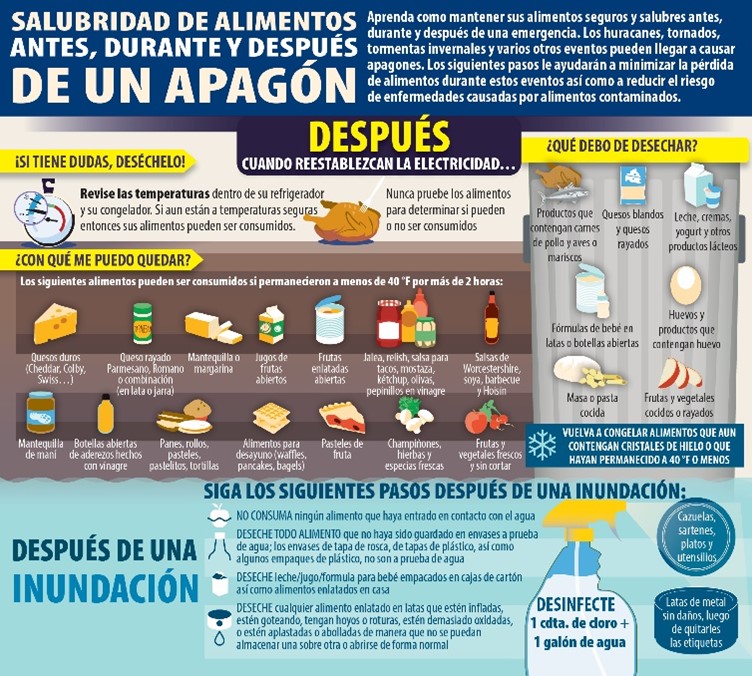
- Si se ha cortado la electricidad durante varios días, verifique la temperatura del congelador con un termómetro para electrodomésticos o un termómetro para alimentos. Si la comida todavía contiene cristales de hielo o está a 40 grados F o menos, la comida es segura.
- Si no se ha guardado un termómetro para electrodomésticos en el congelador, revise cada paquete de alimentos para determinar su seguridad. Si la comida todavía contiene cristales de hielo, la comida es segura.
- Después de 4 horas sin electricidad, transfiera los alimentos perecederos refrigerados como carne, aves, pescado, quesos blandos, leche, huevos, sobras y productos delicatessen a una hielera con hielo o deséchelos.
- Durante una tormenta de nieve, no coloque alimentos perecederos en la nieve. Las temperaturas exteriores pueden variar y los alimentos pueden quedar expuestos a condiciones insalubres y a animales. En su lugar, haz hielo. Llene baldes, recipientes de leche vacíos o latas con agua y déjelos afuera para que se congelen. Utilice el hielo casero en su refrigerador, congelador o hieleras.
- Después del corte de energía
- Deseche cualquier alimento perecedero que no haya estado a una temperatura segura (más de 4 horas en el refrigerador, 24 horas en el congelador medio lleno o 48 horas en el congelador lleno). Los alimentos se pueden volver a congelar de manera segura si todavía contienen cristales de hielo o si están a 40 grados F o menos.
- Nunca pruebe un alimento para determinar su seguridad. En caso de duda, ¡tírelo!
- Visite nuestras tablas de alimentos refrigerados y congelados en la hoja informativa Guía del Consumidor Sobre Inocuidad Alimentaria: Tormentas Severas y Huracanes para saber cuándo guardar y cuándo desechar los alimentos.
Inundaciones
- Planifique con anticipación: si es posible, levante los refrigeradores y congeladores del piso y coloque bloques de cemento debajo de las esquinas. Mueva los productos enlatados y otros alimentos que se guardan en el sótano o en gabinetes bajos a un área más alta.
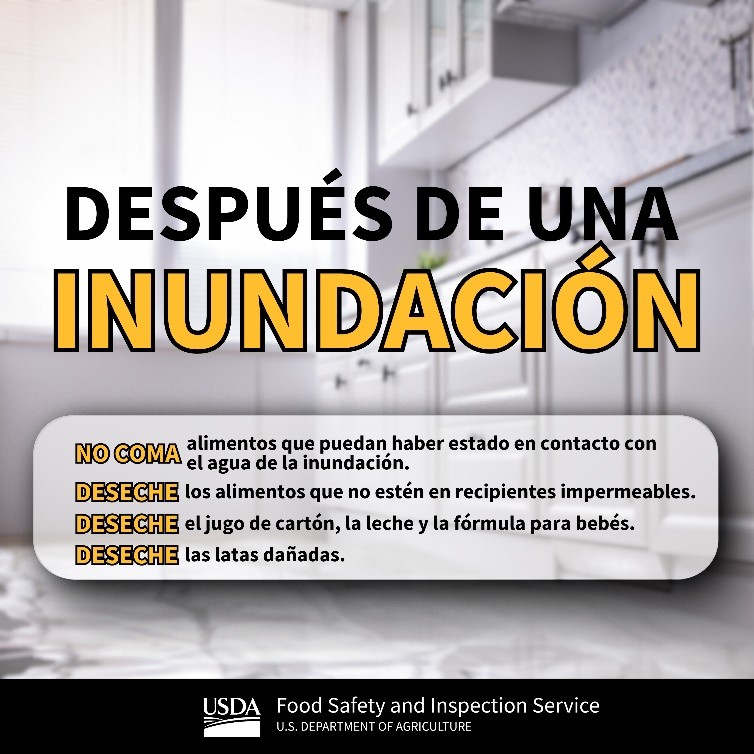
- Después de la inundacion
- No coma ningún alimento que pueda haber estado en contacto con el agua de la inundación.
- Deseche cualquier alimento que no esté en un recipiente impermeable si existe la posibilidad de que haya entrado en contacto con el agua de la inundación. Los recipientes de alimentos que no son impermeables incluyen aquellos con tapas de rosca, tapas a presión, tapas abatibles y tapas engarzadas.
- Deseche el agua embotellada, las cajas de cartón de jugo/leche/fórmula para bebés y los alimentos enlatados caseros si han estado en contacto con el agua de la inundación, porque no se pueden limpiar ni desinfectar eficazmente.
- Inspeccione los alimentos enlatados y deseche los que estén en latas dañadas. El daño de las latas se manifiesta por hinchazón, fugas, perforaciones, agujeros, fracturas, oxidación profunda y extensa o aplastamiento/abolladuras lo suficientemente graves como para impedir el apilamiento normal o la apertura con un abrelatas manual con rueda. Los alimentos preparados comercialmente y en buen estado en latas totalmente metálicas y bolsas de esterilización, como bolsas flexibles y no perecederas para jugo o mariscos, se pueden conservar siguiendo estos pasos:
- Retire las etiquetas si es posible. Pueden albergar suciedad y bacterias.
- Lave bien las latas o las bolsas de esterilización con agua y jabón (use agua caliente si está disponible).
- Cepille o limpie la suciedad o el sedimento.
- Enjuague las latas o bolsas de esterilización con agua que sea segura para beber (si está disponible). La suciedad o los restos de jabón reducirán la eficacia del saneamiento con cloro.
- Luego, desinféctelos por inmersión de una de las siguientes maneras:
- Colocar en agua. Deja que el agua hierva durante 2 minutos.
O - Colóquelo en una solución recién preparada que consiste en 1 cucharada de cloro líquido sin perfume por galón de agua potable (o el agua más limpia y clara disponible) durante 15 minutos.
- Deje secar al aire durante un mínimo de 1 hora antes de abrirlo o guardarlo.
- Vuelva a etiquetar las latas o bolsas de retorta con un marcador. Incluya la fecha de vencimiento si está disponible.
- Utilice la comida de estas latas y bolsas reacondicionadas lo antes posible. Cualquier fórmula concentrada para bebés en recipientes reacondicionados totalmente metálicos debe diluirse con agua potable limpia.
- Utensilios de Cocina y Mostradores
- Lave minuciosamente las cacerolas de metal, los platos de cerámica y los utensilios (incluidos los abrelatas) con agua y jabón, utilizando agua caliente si está disponible. Enjuáguelos y luego desinféctelos hirviéndolos en agua limpia o sumergiéndolos durante 15 minutos en una solución de 1 cucharada de cloro líquido sin perfume por galón de agua potable (o el agua más limpia y clara disponible).
- Lave minuciosamente los mostradores con agua y jabón, utilizando agua caliente si está disponible. Enjuáguelos y luego desinféctelos aplicando una solución de 1 cucharada de cloro líquido sin perfume por galón de agua potable (o el agua más limpia y clara disponible). Dejar secar al aire.
Incendios
- Deseche todos los alimentos que hayan estado cerca del fuego. Los alimentos expuestos al fuego pueden resultar dañados por el calor del fuego, los vapores del humo y los productos químicos contra incendios. Estos vapores y productos químicos no se pueden eliminar con lavado. Estos incluyen:
- Alimentos almacenados fuera del refrigerador, como pan, frutas y verduras.
- Alimentos crudos o en envases permeables (cartón, plástico, etc.)
- Todos los alimentos en latas, botellas y frascos. Si bien pueden parecer que están bien, el calor del fuego puede dañar los recipientes y activar las bacterias que deterioran los alimentos.
- Alimentos almacenados en refrigeradores o congeladores. Los sellos del refrigerador no son herméticos y pueden entrar vapores.
- Desinfecte los utensilios de cocina expuestos a productos químicos contra incendios lavándolos con agua caliente y jabón. Luego sumerja durante 15 minutos en una solución de 1 cucharada de cloro líquido sin perfume por galón de agua potable.
Folletos y Publicaciones Gratuitas Sobre Seguridad Alimentaria
El FSIS ofrece una Guía del Consumidor Gratuita Sobre Tormentas Y Huracanes Severos. Para solicitar una copia, visite nuestra página de Folletos y publicaciones y envíe un formulario de solicitud de publicación. Esta guía y muchas otras publicaciones también están disponibles para ordenar, descargar o ver en formato PDF, tanto en inglés como en español.
Otras Fuentes de Información de Emergencia Sobre Seguridad Alimentaria
- Comuníquese con la línea directa de carnes y aves de corral del USDA si tiene alguna pregunta sobre seguridad alimentaria al 1-888-MPHotline (1-888-674-6854), envíe un correo electrónico a MPHotline@usda.gov de 10 a. m. a 6 p. m. Hora del este, de lunes a viernes.
- Administración de Alimentos y Medicamentos de EE. UU.
www.fda.gov/Food/default.htm - Centros para el Control y la Prevención de Enfermedades
www.cdc.gov - Agencia Federal para el Manejo de Emergencias
www.fema.gov - Su capítulo local de la Cruz Roja Estadounidense o la Defensa Civil también pueden ofrecer información adicional sobre el manejo de emergencias.
Comparta la guía sobre seguridad alimentaria durante emergencias climáticas con sus seguidores y asegúrese de usar el hashtag: #FoodSafety, síganos en X en inglés o español, Instagram y Facebook para ver nuestro contenido sobre seguridad alimentaria y vuelva a publicarlo. ¡No olvides etiquetarnos!
Ejemplos:
- ¿Está experimentando condiciones climáticas adversas? Hay varias cosas que puede hacer para garantizar la seguridad de sus alimentos. Visite, Mantenga Sus Alimentos Seguros Durante Emergencias: Cortes de Energía, Inundaciones e Incendios.
- Durante los cortes de energía, mantenga el refrigerador/congelador CERRADO tanto como sea posible para mantener la temperatura. Abrir/cerrar varias veces saca los alimentos perecederos de la zona de temperatura de seguridad alimentaria. Visite la hoja informativa Zona de Peligro para obtener más información.
- Consulte nuestra tabla de orientación alimentaria sobre “qué guardar y qué tirar” después de un corte de energía prolongado.
Seguridad Alimentaria Antes de un Corte de Energía
Inglés: https://flic.kr/p/2qb8Zam
Español: https://flic.kr/p/2qbbDig
Seguridad Alimentaria Durante un Corte de Energía
Inglés: https://flic.kr/p/2qb8Zam
Español: https://flic.kr/p/2qb8oWk
Seguridad Alimentaria Después de un Corte de Energía
Inglés: https://flic.kr/p/2qb8oW5
Español: https://flic.kr/p/2qb7W8u

Después de una Inundación
Inglés: https://flic.kr/p/2b3BNFv
Español: https://flic.kr/p/29X7hk9
Seguridad Alimentaria Antes y Durante un Corte de Energía
Inglés: https://flic.kr/p/Lcamv8
Español: https://flic.kr/p/Lcanjc
Seguridad Alimentaria Después de un Corte de Energía
Inglés: https://flic.kr/p/KfCrZD
Español: https://flic.kr/p/L9hmzS
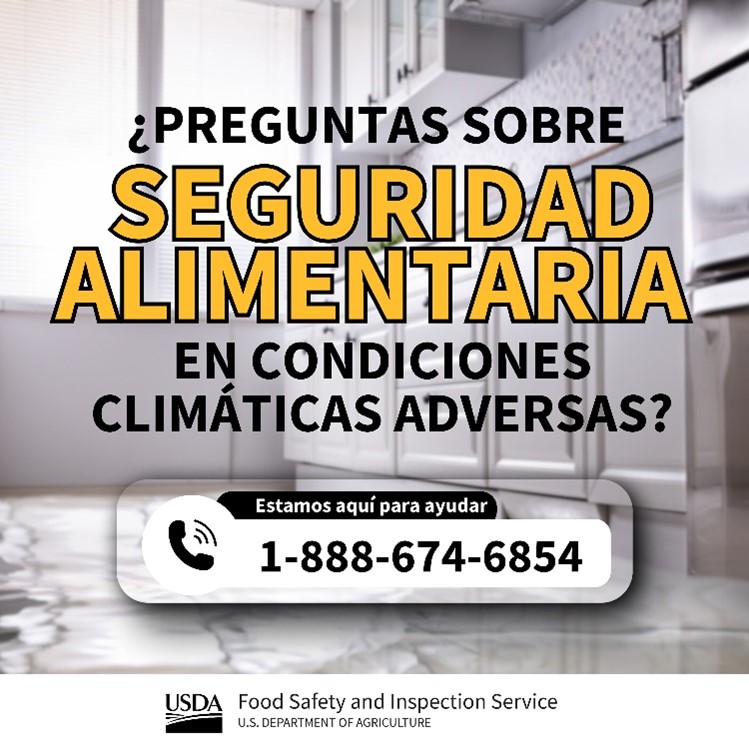
¿Preguntas Sobre Seguridad Alimentaria En Condiciones Climáticas Adversas?
Inglés: https://flic.kr/p/2qa8mz5
Español: https://flic.kr/p/2qa8nYn
Después de una Inundación
Inglés: https://flic.kr/p/2qaecdP
Español: https://flic.kr/p/2qafhuf
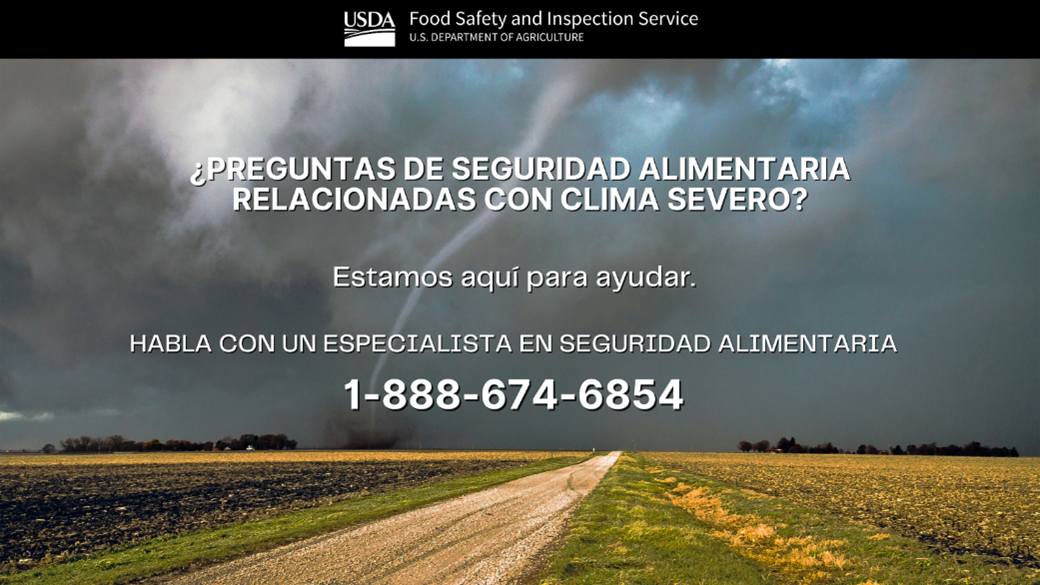
¿Preguntas Sobre Seguridad Alimentaria Relacionadas Con Clima Severo?
Inglés: https://flic.kr/p/2qb23NE
Español: https://flic.kr/p/2qb23N4
USDA Branding Usage
Please refer to this branding material for the correct usage of the USDA logo, colors and fonts. These materials are available to you at no charge, but any and all uses must conform to these guidelines. Contact USDA for approval of other uses or applications by writing to: fsis.outreach@usda.gov.


The USDA logo shall be reproduced in either one or two colors. The official colors for the USDA symbol are dark blue (PMS 288) and dark green (PMS 343). When reproduced in one color, the symbol shall be black. When the symbol is placed on a color field, it should be reversed to white.
The USDA symbol is designated for display on all information products of the Department. To ensure maximum visibility, the preferred position of the symbol on most information products is the top left corner.
When used in conjunction with symbol of other public and/or private-sector partners, the logo should be given equal placement and may be displayed without the Department name. If all of the symbols represent Federal organizations, the symbols should be placed in alphabetical order. If the organizations are a mix of Federal and non-Federal, the lead Federal agency symbol should appear first with the remaining symbols ordered as dictated by the situation.


